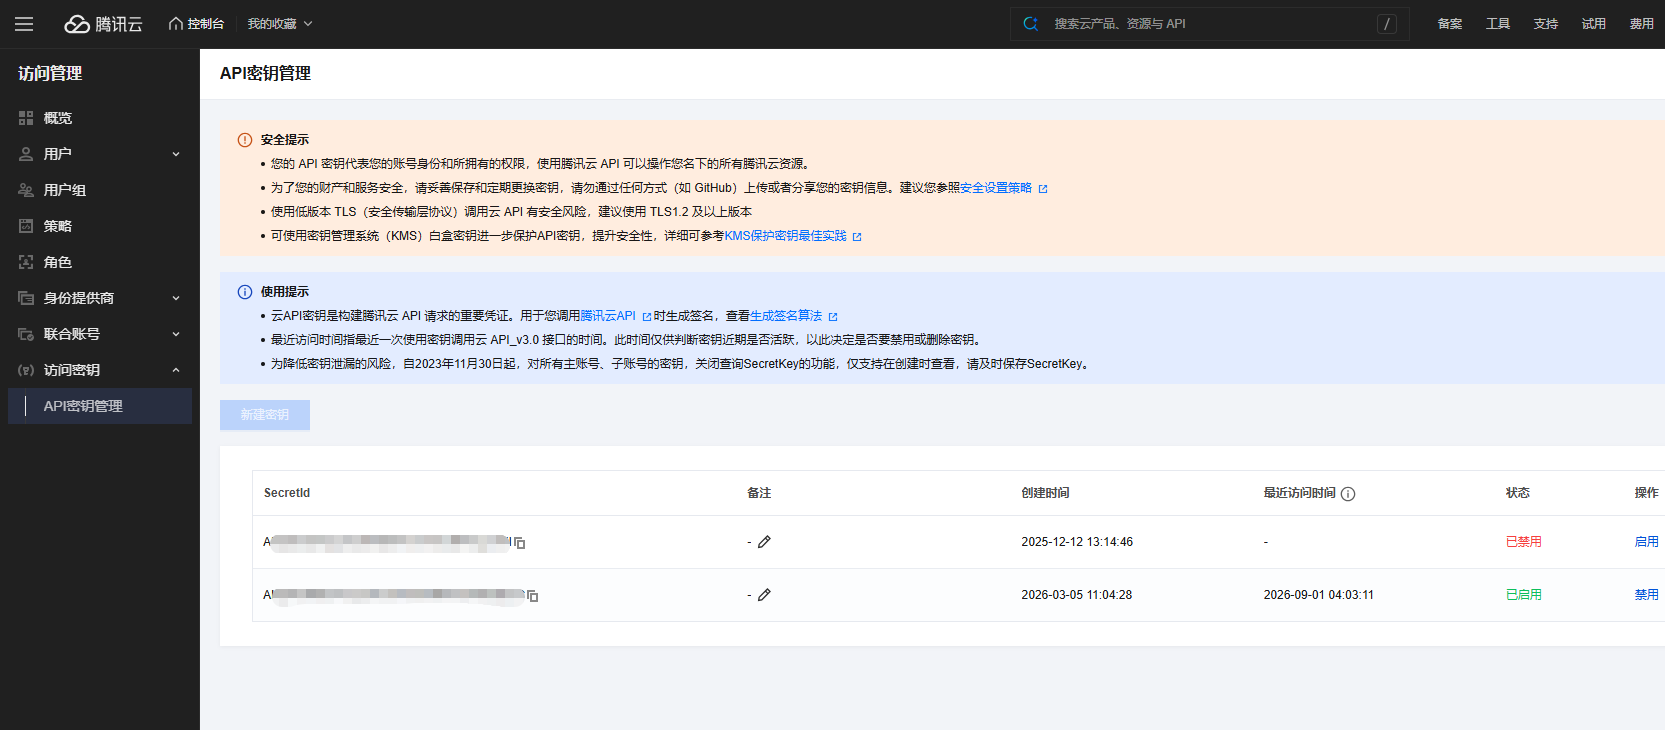
1、创建腾讯云密钥
SecretId SecretId

登录 – 腾讯云
腾讯云为数百万的企业和开发者提供安全、稳定的云服务器、云主机、CDN、对象存储、域名注册、云存储、云数据库等云服务,帮助用户解决游戏、视频、移动、微信、互联网+等行业的架构难题,是全球领先的云计算服务商。

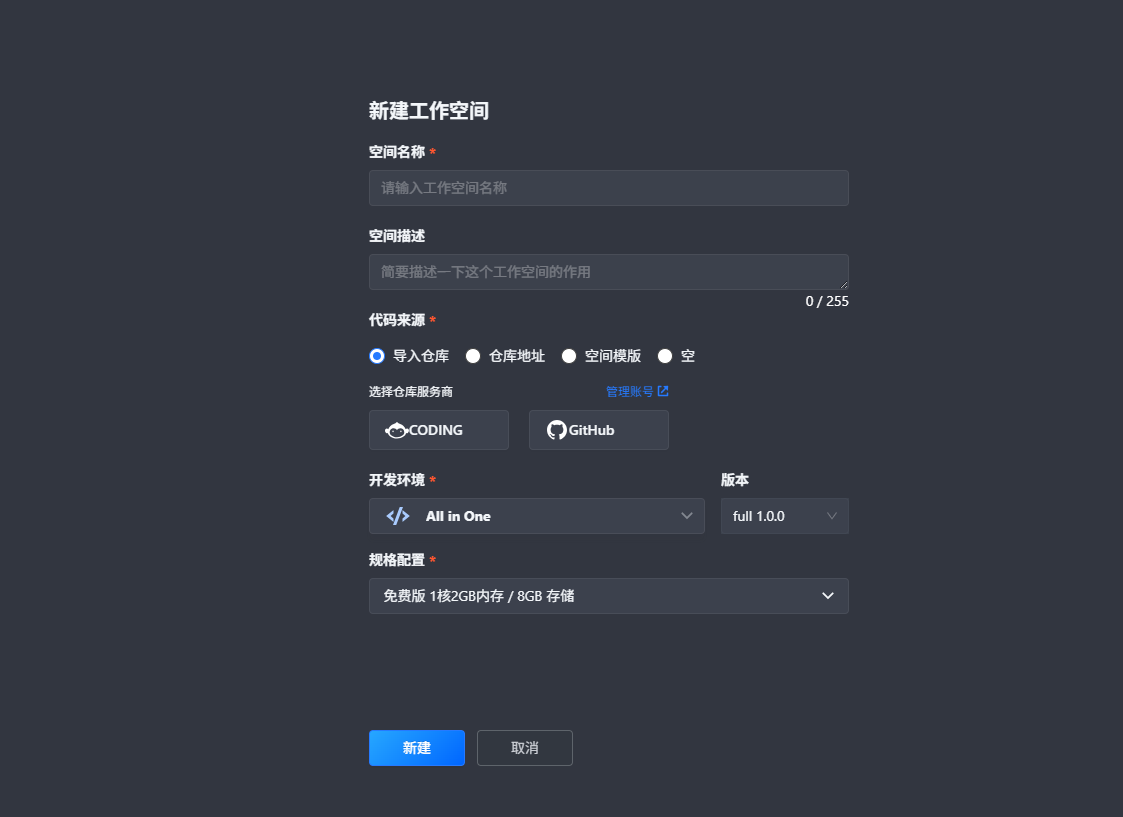
2、创建旧版IDE Studio 容器
注意创建免费版1c2g 8g存储 (用来跑自己的轻量服务,中转访问墙外站点都可以;当然他也有送每个月1w分钟的机时,你也可以通过api控制某个时间段启动关闭容器,当然我只用免费版,不过有个缺点就是只能源码部署,不支持docker)


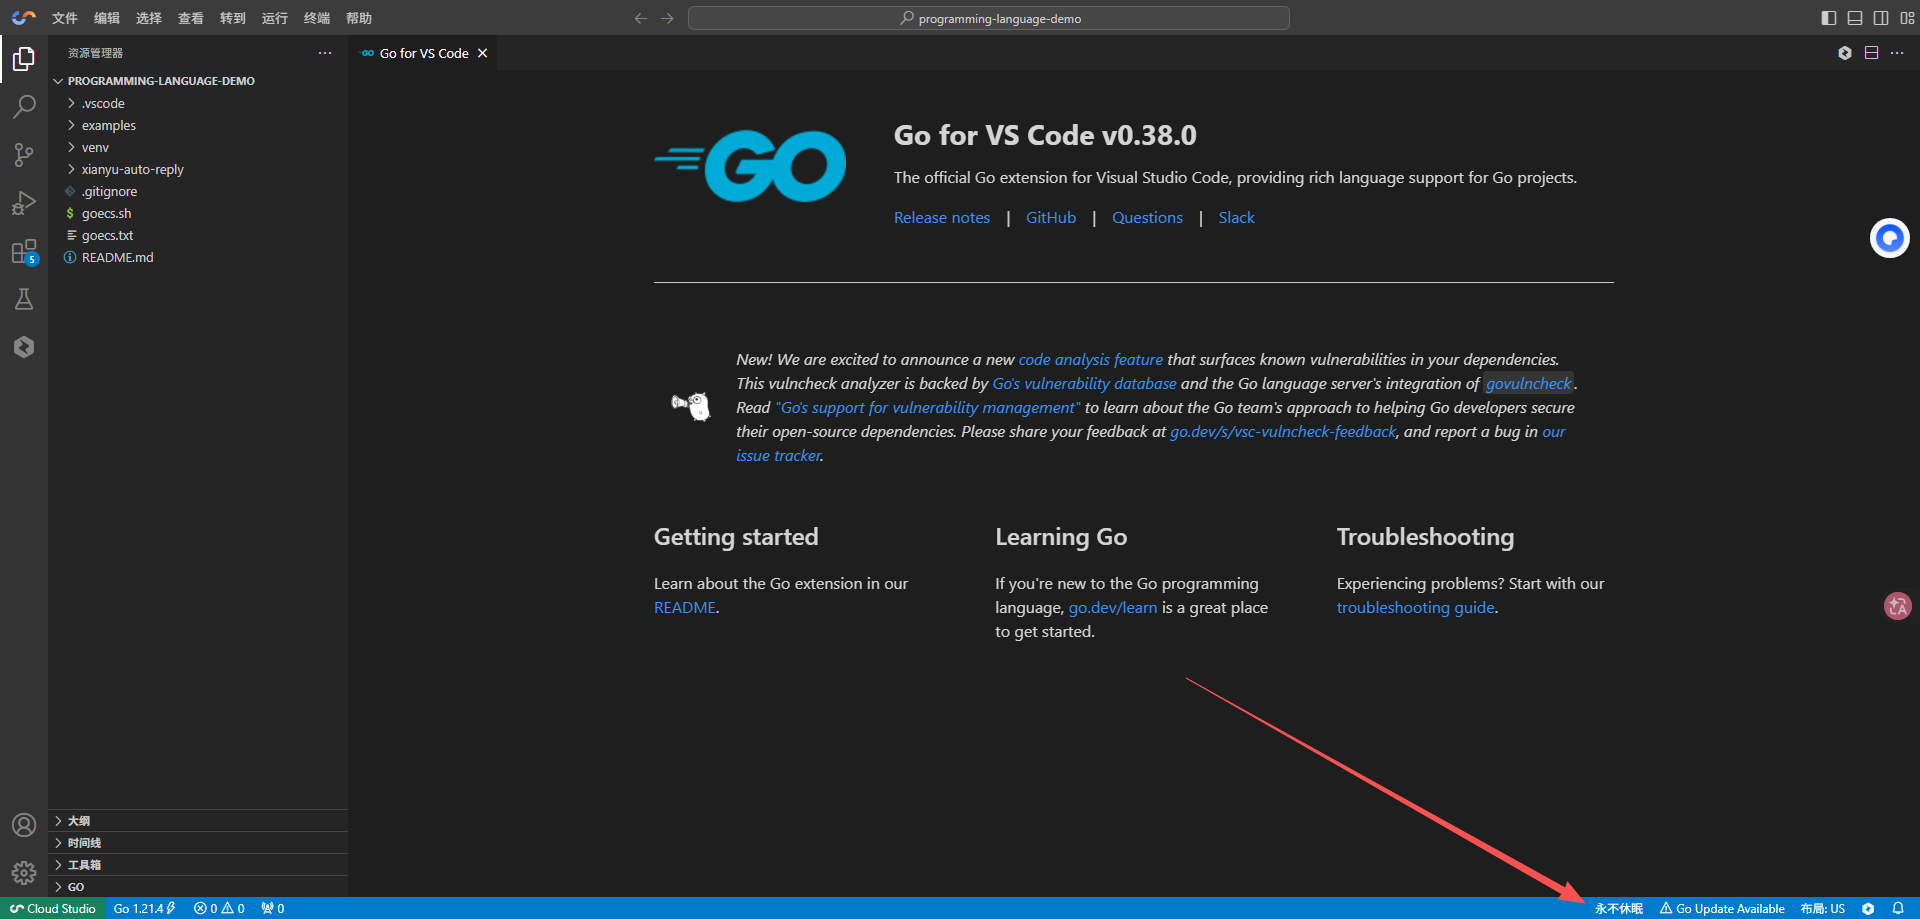
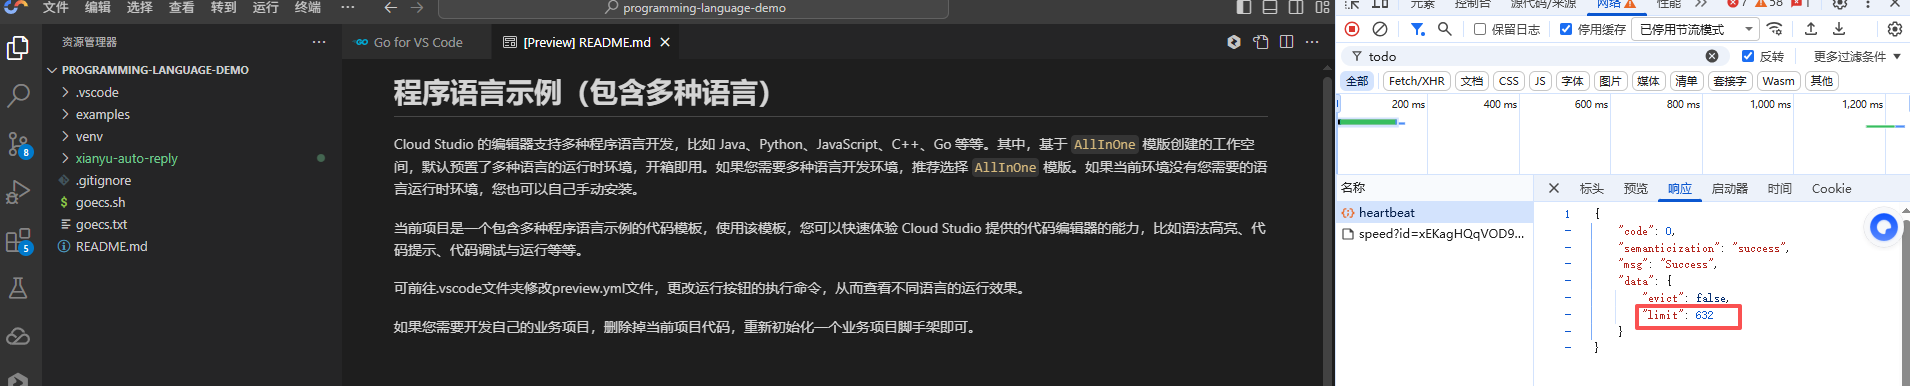
设置永不休眠
进入容器中设置永不休眠

然后我发现这个免费容器虽然设置永不休眠,但是每次启动会持续运行1440分钟。

偶尔可能会中断几秒或者1分钟,没衔接上保活
Cloud studio
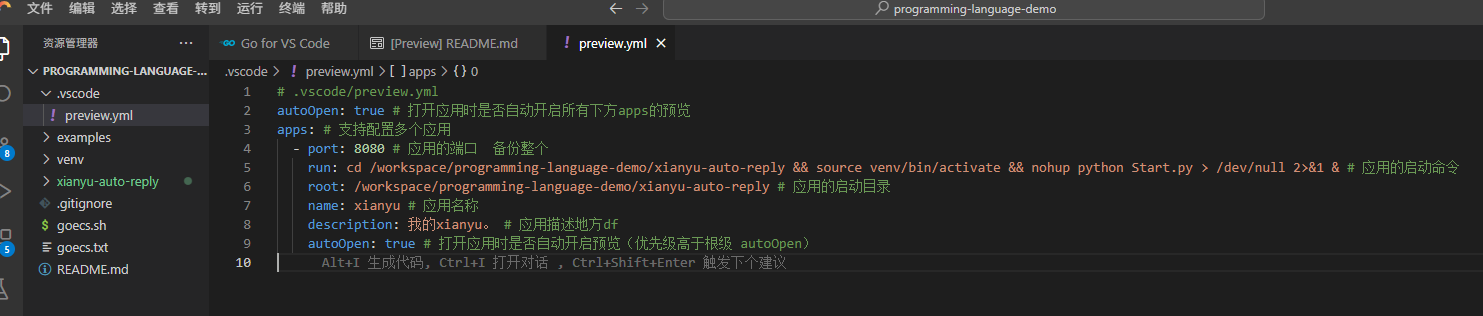
编辑程序自启动脚本
再次重启容器的话由于不支持docker, 想要控制容器内部程序启动的方式就是配置
.vscode/preview.yml 结合空间密钥 使用browserless api 无头浏览器访问你的ide空间地址, 触发相关程序启动

3、官方接口控制容器保活
登录 – 腾讯云
腾讯云为数百万的企业和开发者提供安全、稳定的云服务器、云主机、CDN、对象存储、域名注册、云存储、云数据库等云服务,帮助用户解决游戏、视频、移动、微信、互联网+等行业的架构难题,是全球领先的云计算服务商。

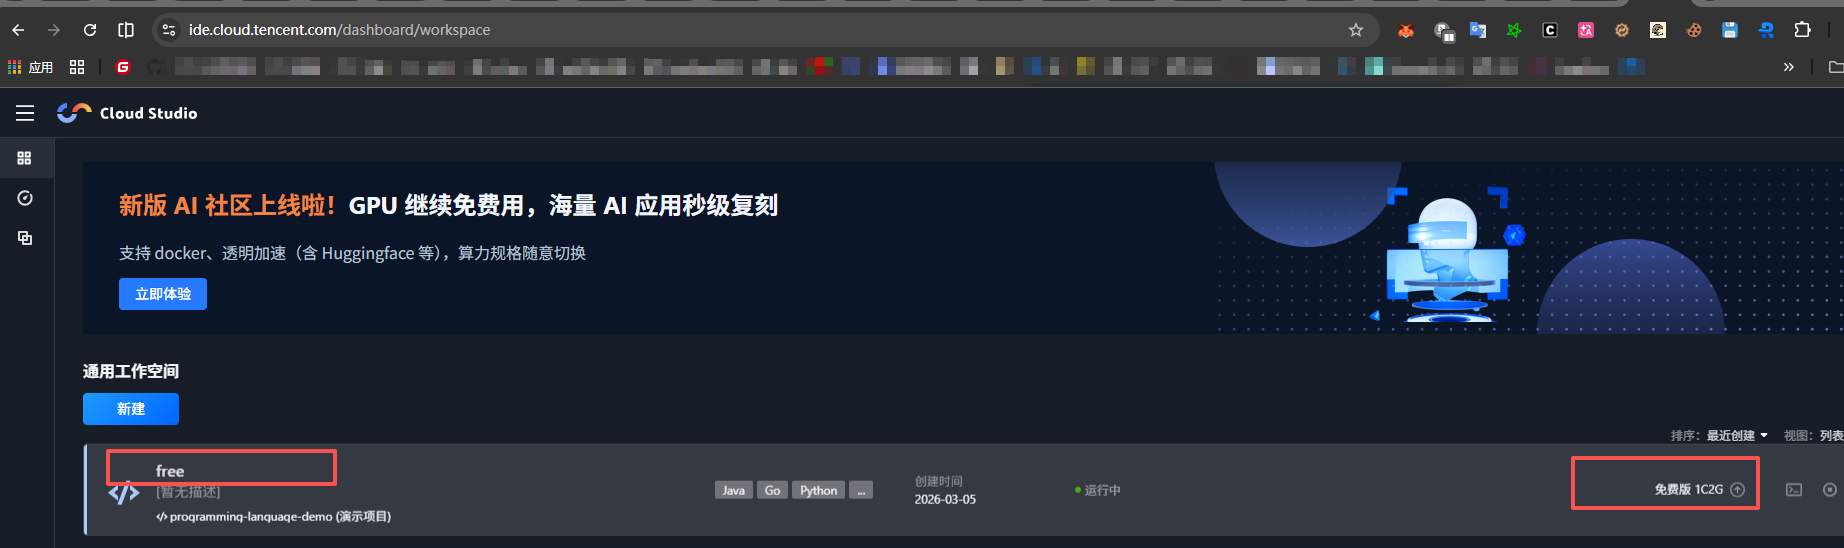
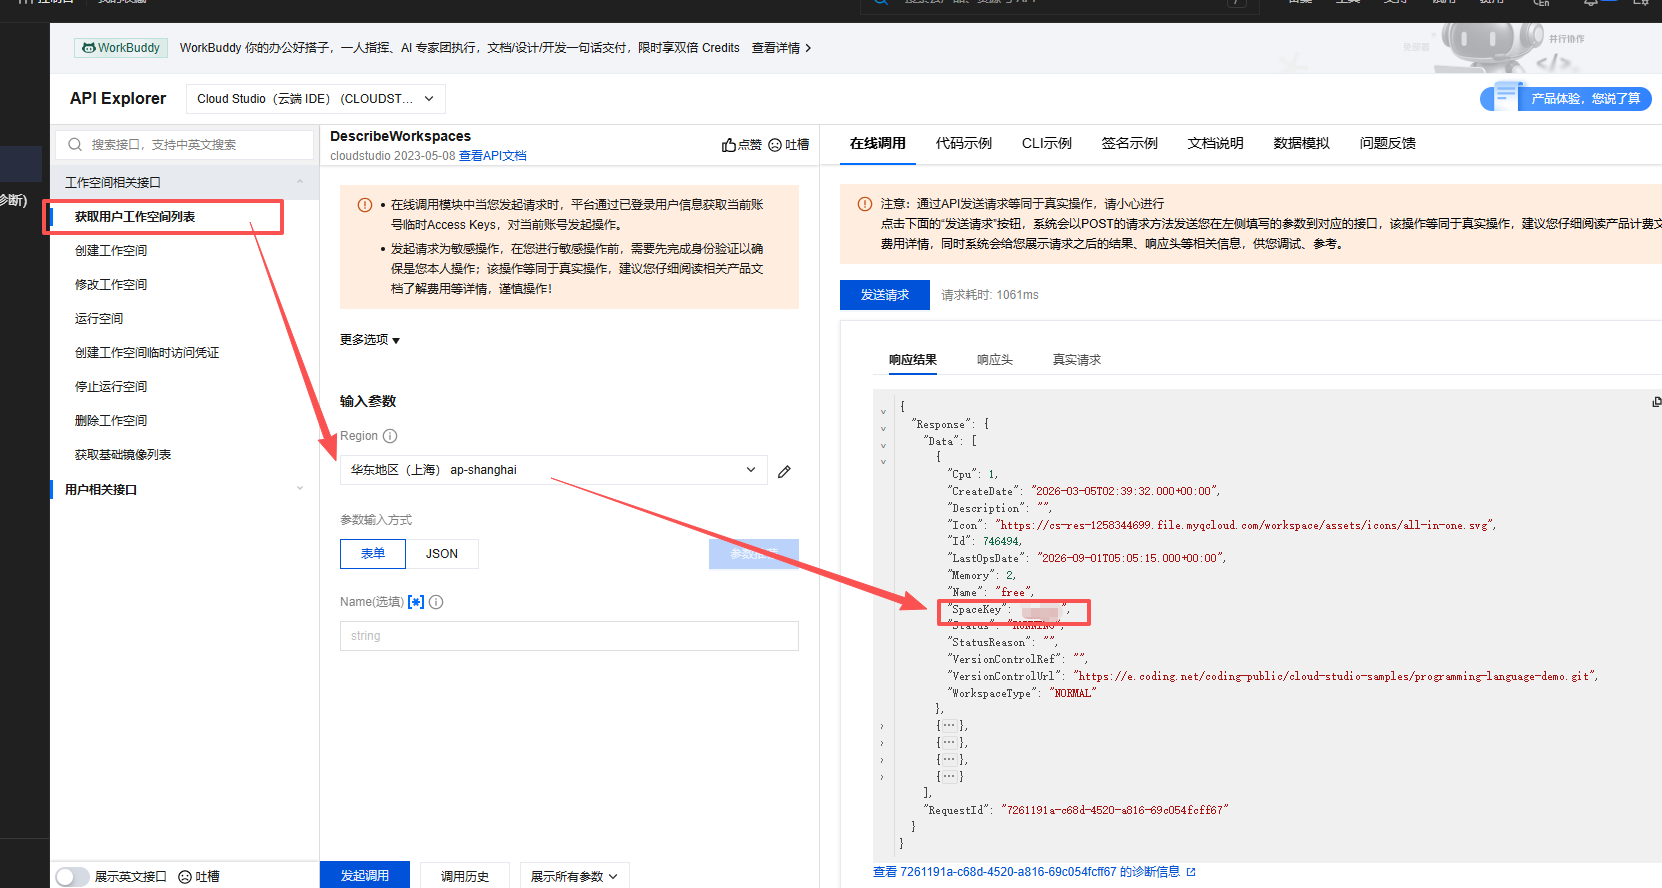
获取 spaceKey 相当于空间id
记住刚刚免费容器的spaceKey

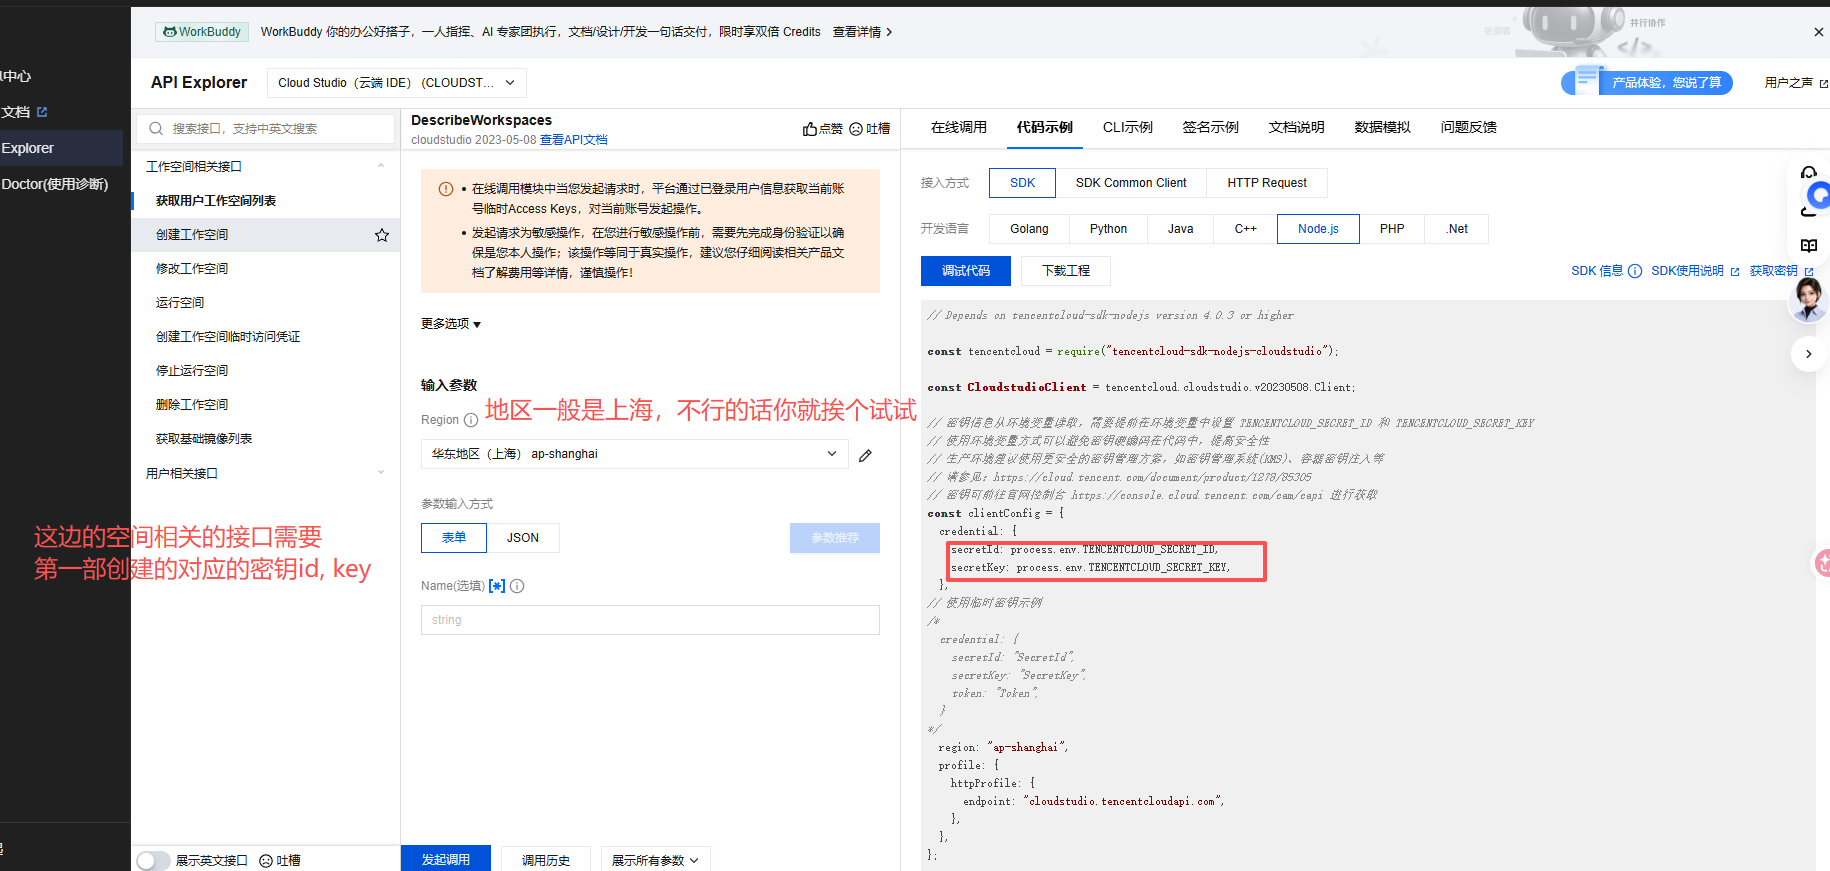
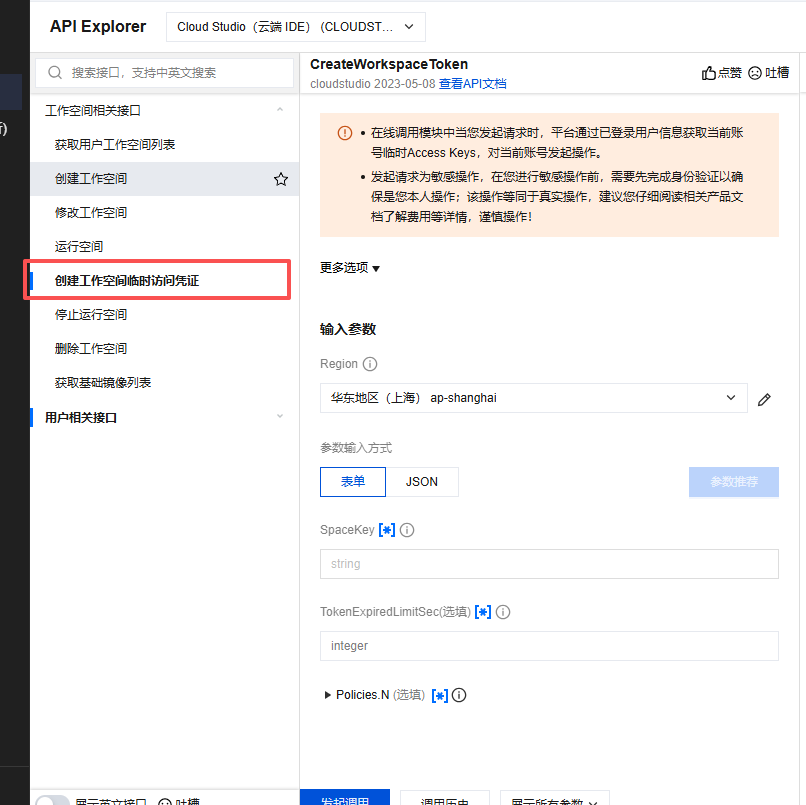
创建free空间对应的空间密钥
空间密钥通过腾讯云密钥创建,空间密钥需要上面的spaceKey, 创建空间密钥的时候将过期时间设置长一点

保活脚本大致参考
// https://console.cloud.tencent.com/cam/capi// 启动 POST https://workerAppName.yourCfSpaceName.workers.dev/start/{spaceKey} // 停止 POST https://workerAppName.yourCfSpaceName.workers.dev/stop/{spaceKey} // 保活 POST https://workerAppName.yourCfSpaceName.workers.dev/heart/{spaceKey} // 通过cfworker 地址重定向访问网页ide https://workerAppName.yourCfSpaceName.workers.dev/ide/{spaceKey} // 工作空间临时访问凭证 https://console.cloud.tencent.com/api/explorer?Product=cloudstudio&Version=2023-05-08&Action=CreateWorkspaceToken// { [spaceKey]: token }// *********************************************************************************************************const foreverToken = { '{你的spaceKey}': "{你的空间密钥}", // 提前生成空间对应的几十年有效期token}const SECRET_ID = '{你的腾讯云账号SecretId}'const SECRET_KEY = '{你的腾讯云账号SecretKey}'const workerHost = 'https://workerAppName.yourCfSpaceName.workers.dev' // 改成你的域名// 按日期轮询const browserlessKeys = [ '{你的broserless key}', // 可以创建两三个,可能一个也够用了,或者你用cf 自带的浏览器自动化api 也行, 用于触发 .vscode/preview.yml 程序自启动]const freeIds = ['{你的spaceKey}']// *********************************************************************************************************// 访问网页等待终端加载const init = (spaceKey, token) => { return fetch("https://production-sfo.browserless.io/function?token=" + browserlessKeys[new Date().getDay()], { "headers": { "Content-Type": `application/javascript`, }, "body": `export default async({page})=>{await page.goto("https://ide.cloud.tencent.com/tty/${spaceKey}/?report_open_type=list_open&token=`+ token +'",{waitUntil:"networkidle2"});await page.waitForSelector(`.xterm-link-layer`, { timeout: 180000 });}', "method": "POST" });}export default { scheduled: scheduled, fetch: fetchHandler};// * * * * * 使用定时任务面板触发定时async function scheduled(event, env, ctx) { const now = new Date(); // console.log("当前不在指定执行窗口内"); // 1. 核心修正:手动将 UTC 时间转换为 东八区 (UTC+8) 时间 // getUTCHours() 获取 UTC 小时 // 加 8 小时,并对 24 取模防止超过 23 点 const utcHour = now.getUTCHours(); let beijingHour = (utcHour + 8) % 24; let beijingMinute = now.getUTCMinutes(); console.log(`UTC 时间: ${utcHour.toString().padStart(2, '0')}:${beijingMinute.toString().padStart(2, '0')} | 东八区推算: ${beijingHour.toString().padStart(2, '0')}:${beijingMinute.toString().padStart(2, '0')}`); // 2. 判断逻辑优化 // worker 需要启用兼容性标志才能自己调用自己 global_fetch_strictly_public await Promise.allSettled(freeIds.map(spaceKey => fetchHandler(`${workerHost}/heart/${spaceKey}`/**, { "body": null, "method": "POST" } */))) // 凌晨4点重启 if (beijingHour !== 4 ) return // beijingMinute = 0 for await (const [index, spaceKey] of freeIds.entries()) { // 分别再4:00 4:03 4:06 4:09 ... 间隔开启动应用 if (beijingMinute === index * 3) { try { // 机器可能会自动停,可能都不需要这个操作 // await fetchHandler(`${workerHost}/stop/${spaceKey}`/**, { "body": null, "method": "POST" } */) } catch (error) { console.log(error) } // 确保没开机的机器开机 await fetchHandler(`${workerHost}/start/${spaceKey}`/**, { "body": null, "method": "POST" } */) } } // 提供给cron 反馈用 return}async function fetchHandler(request, env, ctx) { const url = new URL(typeof request === 'string' ? request : request.url); let spaceKey = url.pathname.replace(/(.*/)/,'') if (url.pathname.includes('/scheduled')) { await scheduled(request, env, ctx) return new Response(JSON.stringify('completed', null, 2), { status: 200, headers: { 'Content-Type': 'application/json' } }); } if (url.pathname.includes('/start/all')) { for await (const [index, spaceKey] of freeIds.entries()) { // 确保没开机的机器开机await fetchHandler(`${workerHost}/start/${spaceKey}`/**, { "body": null, "method": "POST" } */) } return new Response(JSON.stringify('ok', null, 2), { status: 200, headers: { 'Content-Type': 'application/json' } }); } if (!(url.pathname.includes('/start') || url.pathname.includes('/stop') || url.pathname.includes('/heart') || url.pathname.includes('/ide') || url.pathname.includes('/mockserver'))) return; if(request.method !== 3) { let action = '' if (url.pathname.includes('/start')) action = 'RunWorkspace' if (url.pathname.includes('/stop')) action = 'StopWorkspace' if (url.pathname.includes('/heart') || url.pathname.includes('/ide') || url.pathname.includes('/mockserver')) action = 'CreateWorkspaceToken' try { // const { spaceKey } = await request.json(); if (!spaceKey) { return new Response(JSON.stringify({ Error: "Missing spaceKey" }), { status: 400, headers: { 'Content-Type': 'application/json' } }); } const response = await runTencentCloudAPI(env, spaceKey, action); // !!!如果是启动应用, 需要打开网页进行初始化程序 if (action === 'RunWorkspace') { const response = await runTencentCloudAPI(env, spaceKey, 'CreateWorkspaceToken'); const token = response.Response.Token const res = await init(spaceKey, token) console.log(await res.text()) } if (action === 'CreateWorkspaceToken') { const token = response.Response.Token if (url.pathname.includes('/heart')) { return fetch("https://ide.cloud.tencent.com/api/workspace/"+ spaceKey +"/heartbeat", { "headers": { "authorization": `Bearer ${token}`, "x-ide-workspace-session-id": `baa4d673-2hg6-4014-861a-${(Date.now()+'').slice(1,13)}`, }, "body": null, "method": "GET" }); } // 获取ide 访问路径 if ( url.pathname.includes('/ide') ) { return Response.redirect(`https://ide.cloud.tencent.com/tty/${spaceKey}/?report_open_type=list_open&token=`+ token, 301); } } return new Response(JSON.stringify({ Success: response }), { status: 200, headers: { 'Content-Type': 'application/json' } }); } catch (error) { return new Response(JSON.stringify({ Error: error.message }), { status: 500, headers: { 'Content-Type': 'application/json' } }); } } return new Response('Not Found', { status: 404 });}// --- 工具函数 ---async function getHash(message) { const encoder = new TextEncoder(); const hashBuffer = await crypto.subtle.digest('SHA-256', encoder.encode(message)); return Array.from(new Uint8Array(hashBuffer)) .map(b => b.toString(16).padStart(2, '0')) .join('');}/** * 核心修正点:支持字符串和 ArrayBuffer 两种类型的密钥 * @param {string | ArrayBuffer} key - 密钥 (可以是原始字符串或二进制数据) * @param {string} message - 要签名的消息 * @returns {ArrayBuffer} - 签名的二进制数据 */async function hmacSha256(key, message) { const encoder = new TextEncoder(); // 1. 准备密钥数据 let keyData; if (typeof key === 'string') { // 如果是字符串,直接编码 keyData = encoder.encode(key); } else { // 如果是 ArrayBuffer (来自上一轮 HMAC 输出),直接使用 keyData = key; } // 2. 导入密钥 (关键步骤:必须先导入才能用于 sign) // 注意:这里使用 extractable: false 是标准做法 const cryptoKey = await crypto.subtle.importKey( 'raw', // 密钥数据格式 keyData, // 密钥数据 (Uint8Array) { name: 'HMAC', hash: { name: 'SHA-256' } }, // 算法 false, // 是否可导出 ['sign'] // 用途 ); // 3. 生成签名 return await crypto.subtle.sign('HMAC', cryptoKey, encoder.encode(message));}function arrayBufferToHex(buffer) { return Array.from(new Uint8Array(buffer)) .map(b => b.toString(16).padStart(2, '0')) .join('');}function getDate(timestamp) { const date = new Date(timestamp * 1000); const year = date.getUTCFullYear(); const month = String(date.getUTCMonth() + 1).padStart(2, '0'); const day = String(date.getUTCDate()).padStart(2, '0'); return `${year}-${month}-${day}`;}/** * 调用腾讯云 API */async function runTencentCloudAPI(env, spaceKey, action = 'RunWorkspace') { if (foreverToken[spaceKey] && action === 'CreateWorkspaceToken') { return await Promise.resolve({ Response: { Token: foreverToken[spaceKey]/** 永久tokend */ } }) } // 请务必在环境变量中配置 如果你是多个free 空间这边得改下,自行调整 if (!SECRET_ID || !SECRET_KEY) { throw new Error("Missing Tencent Cloud credentials"); } const host = "cloudstudio.tencentcloudapi.com"; const service = "cloudstudio"; const region = "ap-shanghai"; // action = "RunWorkspace";// "RunWorkspace" StopWorkspace CreateWorkspaceToken const version = "2023-05-08"; const timestamp = Math.floor(Date.now() / 1000); const date = getDate(timestamp); const payload = JSON.stringify({ SpaceKey: spaceKey }); // --- 1. 规范请求串 --- const canonicalHeaders = `content-type:application/json; charset=utf-8nhost:${host}n`; const signedHeaders = "content-type;host"; const hashedRequestPayload = await getHash(payload); const canonicalRequest = [ 'POST', '/', '', canonicalHeaders, signedHeaders, hashedRequestPayload ].join('n'); // --- 2. 待签名字符串 --- const algorithm = "TC3-HMAC-SHA256"; const credentialScope = `${date}/${service}/tc3_request`; const hashedCanonicalRequest = await getHash(canonicalRequest); const stringToSign = [ algorithm, timestamp, credentialScope, hashedCanonicalRequest ].join('n'); // --- 3. 计算签名 (链式调用) --- // 注意:这里的 kDate, kService, kSigning 都是 ArrayBuffer const kDate = await hmacSha256("TC3" + SECRET_KEY, date); const kService = await hmacSha256(kDate, service); const kSigning = await hmacSha256(kService, "tc3_request"); // 最后一步:将二进制签名转为 Hex 字符串 const signature = arrayBufferToHex(await hmacSha256(kSigning, stringToSign)); // --- 4. 构造请求 --- const authorization = `${algorithm} Credential=${SECRET_ID}/${credentialScope}, SignedHeaders=${signedHeaders}, Signature=${signature}`; const url = `https://${host}`; const headers = { 'Content-Type': 'application/json; charset=utf-8', 'Host': host, 'X-TC-Action': action, 'X-TC-Timestamp': timestamp.toString(), 'X-TC-Version': version, 'X-TC-Region': region, 'Authorization': authorization, }; const fetchResponse = await fetch(url, { method: 'POST', headers, body: payload, }); if (!fetchResponse.ok) { const errText = await fetchResponse.text(); throw new Error(`API Error: ${fetchResponse.status} ${errText}`); } return await fetchResponse.json();}```
5、其他说明worker 自调用需要设置下global_fetch_strictly_publicworker 需要启用兼容性标志才能自己调用自己 global_fetch_strictly_public然后我发现同一个实名用户创建的多个账户,每个账户都可以创建免费ide空间实例,我目前跑了5个 free space, 稳定运行几个月了大致是这样子,笔记丑陋凑活看看,等佬友完善补充下